How to maximize ROI with ExoClick’s Bidder and Conversion Tracking
Advertisers! Have you tested out ExoClick’s improved Conversion Tracking feature? With this tool, you can create Goals to track the performance of your campaigns, follow your campaigns’ progress, and gain useful insights on your audience’s behavior. It is interesting to highlight the usefulness of the Bidder in this case study because you cannot use the Bidder without implementing a Conversion Goal. So by using the Bidder you can automate manual bidding whilst ensuring an effective optimization of your campaigns. ExoClick allows you to track all your data and conversions in real time. The ability to track in real time means that you can make real time decisions on what to do next, to ensure that your campaigns are successful.
Conversion Tracking Case Study
In this Conversion Tracking Case Study, an Advertiser wanted to optimize his ad campaign using The Bidder to clean out ad zones that didn’t perform, whilst tracking the overall campaign performance, with ExoClick’s Conversion Tracking tool. This is a Dating offer for Mobile. The Conversion flow is from a banner ad, to a Prelander, to the Offer’s landing page.
Setting Conversion Tracking Goals: Payout and Target Values
To start setting a new conversion goal, the Conversion Value was set to ‘Fixed’ with a value 5$. Setting the right Conversion Value is potentially the most important step in the process, since it represents the payout of the conversion and is used to calculate the Revenue, Profit and ROI of the campaign. See below:
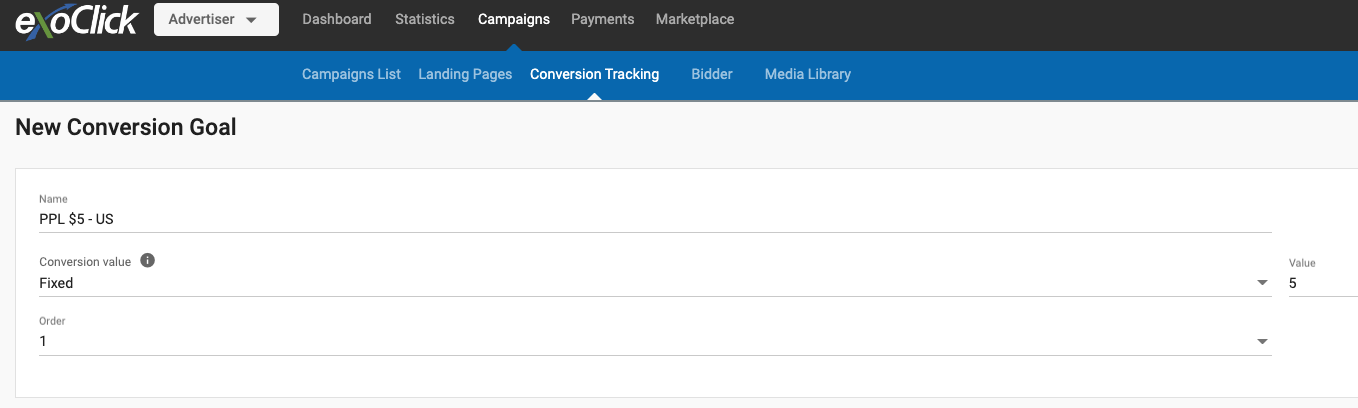
With this information set, you will then be able to see how much revenue you have made from each conversion and whether these conversions are actually covering the costs of a campaign.
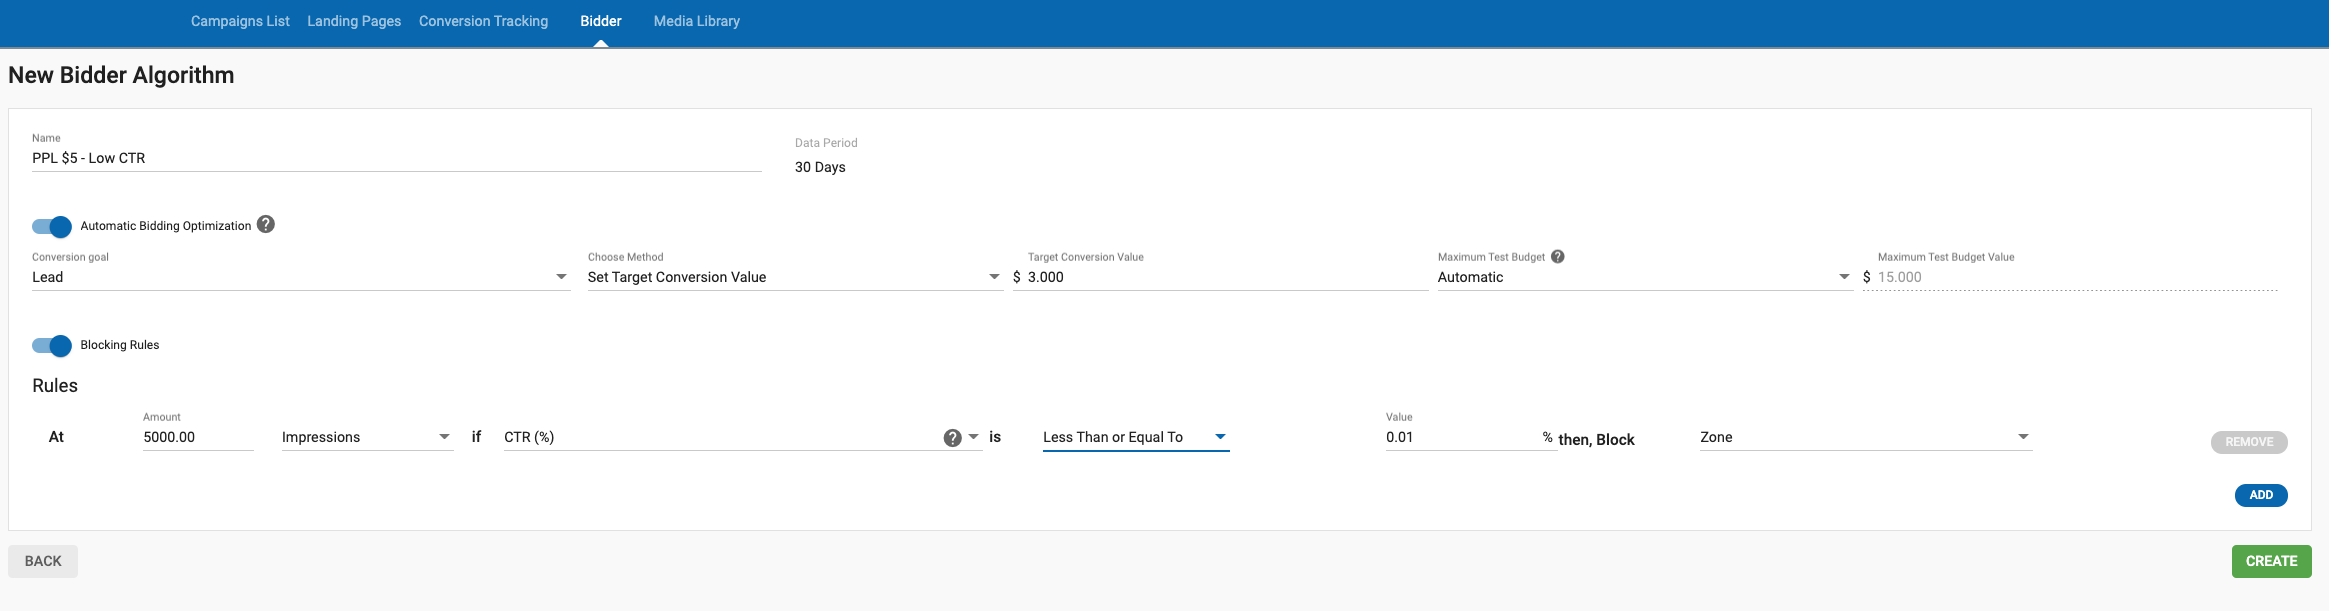
Setting Automatic Bidder Optimization
As we can see in the screenshot below, once the value was set, it was time to set the Automatic Bidder Optimization, the target Conversion value was set to $3 instead of using the initial Goal’s Conversion Value $5 to start testing. The main goal is to make margin, that is the reason the Conversion value was set lower compared to the initial Goal’s Conversion Value. When setting Bidding Algorithms, it is recommended to not use your entire budget and to make sure that there is enough room to test out a wide range of ad zones and sites, keeping in mind that some of them won’t perform and will be blocked by The Bidder’s algorithm. Then, it is a good idea to start small and increase later to avoid spending all the budget all at once.
The Bidder algorithm will identify the zones that don’t work as it learns the campaign’s behavior, in order to optimize biddings and achieve set conversion goals.
For this Advertiser’s Dating offer, under the category ‘Rules’, basic rules were set to be applied to all ad zones. That means that, with the rules set out in the screen shot below, once a specific zone generates 5,000 impressions, if the CTR is equal or inferior to 0.01%, the zone gets blocked.
Testing out results: Bidding prices adjusted by ad zones
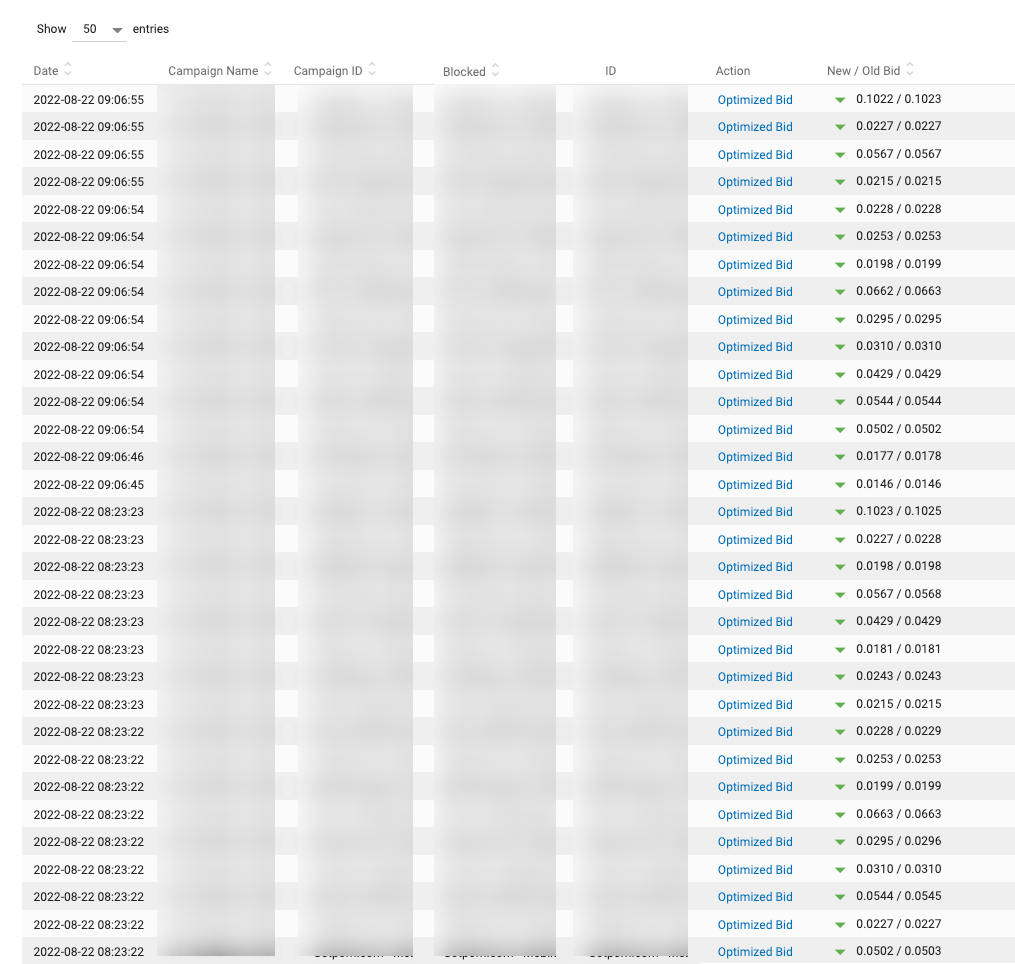
After a few days of running, we can see how the set rules by this Advertiser affected the campaign. Because the Blocking rules and the Conversion Tracking method that he picked were ‘by Zone’ {zone_id}, it tracked the results per each zone that had been tested by the algorithm (see below under the section ‘ID’). As we can see below, the Bidder Conversion Tracking tool checked how many leads were converted and how much of the set budget was spent, by zone.
On the row at the far right (New/Old Bid) we can see how The Bidder adjusted the zone’s bid automatically: ‘Old’ makes reference to the initial bid, whilst ‘New’ is the automatic adjustment that has been prompted by the Bidder to optimize results. We can see there how, for some zones, the bidding price was adjusted to be under the original spending.
Lastly, it was time to use Conversion Tracking to check the overall campaign evolution throughout the days and how The Bidder’s algorithm affected it (screenshot below). The Advertiser launched the campaign on 2022-08-01, starting from a single bid that kept getting adjusted, and as the days went on, the algorithm kept learning and working until the trend in ‘Profit’ and ‘ROI’ evolved from negative to positive.
To better differentiate negative from positive trends, Profit and ROI date can appear in 3 different colors:
- GREEN: ROI is more than 0%. Your return on investment is positive and you are paying less for each conversion than your COA.
- BLACK: ROI is equal to 0%. Your return on investment is almost OK. Check the detailed statistics of the campaign to improve some sources of traffic.
- RED: ROI is less than 0%. Your return on investment is negative and you are paying more for each conversion than you can afford (more than your COA). Check the sources of traffic and your campaign setup for errors.
In this case, the eCPA decreased until reaching below 5$, which translates into green numbers in ‘Profit’ and ‘ROI’. From 2022-08-13, the Advertiser started making profit, after a couple of weeks of testing. Whilst this might seem like a fairly long stretch of time before making real gains on a campaign, it is a normal trend tendency since it takes some time for bidding algorithms to test out all ad zones and pick only the performing ones. For this reason, it is key for advertisers to devote some time and budget to testing pre-launch.
We can also observe in the ‘Impressions’ row how the Advertiser’s campaign kept decreasing. Again, this as a result of non-performing sites being blocked. An increase in Clicks as CTR was also observed as non-performing zones were blocked.

Some Bidder tips
New Bidder Feature: Since carrying out this case study, ExoClick has recently released a new feature to the Bidder, which gives you even more control over your campaign. It now allows you to carry out some manual functions while the Bidder is running:
- Manually block or target zones when setting up a new campaign with the Bidder.
- Manually block or re-enable ad zones that have been automatically optimized or blocked by the Bidder.
- Enable/Disable the Bidder on an existing campaign without erasing any existing optimisations made manually.
Check full details here.
Here are some other changes you can make after the Bidder has optimized the campaign:
Add/rotate variations to avoid banner blindness. After a few months of running your campaign, it will slowly start to lose responsiveness. This is because users, after seeing the same creative over and over again, no longer pay attention to the ad. You can avoid this by continuously adding new variations and checking their performance. Note that you can distribute the traffic to your variations based on their Conversion Ratio.
Create whitelists to target sites aggressively. If a specific site or zone is giving you a lot of conversions and you want to increase your visibility there, you can create a separate campaign targeting those sites zones, using a higher CPM bid and a low frequency capping so as to get as much traffic from the site as possible.
Conclusions
The accurate measurement of metrics and conversions is key to the success of an online campaign, especially when we are juggling multiple campaigns and offers. Keeping track of everything that happens within our campaigns won’t only allow you to gain control and prevent losses, but also to learn from the behavior of the several elements that are within a campaign and your audiences, which will directly impact your future handling and managing of new campaigns. ExoClick’s Conversion Tracking and The Bidder are both free to use within the Admin Panel and provide a powerful tool combination for advertisers, since they combine the potential of a privileged insight into ad campaigns and their inner workings, as well as being able to cut out non-functioning elements and optimizing results automatically.